
The expected ground conditions are one of the most important parts of tunnelling projects.
Suggested guidelines from the ASCE for Geotechnical Baseline Reports (GBR) for underground construction state that a GBR should include the "criteria and methodologies used for the design of ground support and ground stabilization systems, including ground loadings" and the "anticipated ground behavior in response to construction operations within each soil and rock unit" (Essex, 2007). However, these points are not always considered in tunnelling projects. In particular, the latter is often absent, replaced with a listing of rock mass properties based on intact rock testing and rock mass classi¬fication schemes.
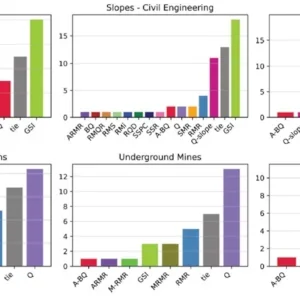
Evaluation of the rock mass quality along an alignment using empirical design tools, such as the Rock Mass Rating system by Bieniawski, and the Q system by Barton, is limited in scope, as physically different rock types are grouped together with the same quality rating. These are termed ‘equivalent materials’ and leads to rock mass behavioral uncertainty. As a result, the equivalent materials are assigned the same rock support class, without consideration of the rock mass failure mechanism. To establish the importance of including structural controls on failure and the rock mass failure mechanism in GBRs, ‘semi-discontinuum’ Phase2 finite element models were used to investigate the impact of five different behavioral ‘equivalent materials’ on a standardized tunnel and rock support design (RocScience, 2013):
i. A 700m deep hydrostatic tunnel in altered, weak rock with three "smooth, undulating" joint sets with "slightly altered joint walls [and] non-softening mineral coatings, sandy particles, clay-free disintegrated rock, etc." The weak rock is "squeezing rock; plastic flow of incompetent rock under the influence of high rock pressures" (Barton et al, 1974).
ii. A 20m deep tunnel in a bedded and cross jointed sedimentary sequence. Three "rough or irregular, planar" joint sets with "silty- or sandy- clay coatings, small clay fraction (non-softening)" in "low stress, near surface" conditions have in-situ stress ratio ![]() K of 1.5 (Barton et al, 1974).
K of 1.5 (Barton et al, 1974).
iii. A 1,300m deep tunnel in massive rock with three "rough or irregular, planar" joints with "unaltered joint walls" (Barton et al, 1974). The high stress environment, with K of 2, results in "moderate slabbing after > 1 hour in massive rock" (Barton and Grimstad, 1994).
iv. A 600m deep tunnel with anisotropic in-situ stress (K of 1.7) in a heterogeneous foliated metamorphic rock. The cleavage planes are "slickenslided, undulating" with "softening or low friction clay mineral coatings, i.e., … chlorite, graphite" (Barton et al, 1974).
v. A 300m deep tunnel with four "smooth, planar" joints with "silty or sandy clay coatings, small clay-fraction (nonsoftening)" form a "sugar cube" rock mass. The highly disturbed mass had a K of 0.75, and a 25m water pressure head to represent the "high stress" and "medium inflow or water pressure" conditions, respectively (Barton et al, 1974).
Input parameters
Design approach using Q
The Q system, developed by Barton, Lien, and Lunde combines the joint block size, joint shear strength, and active stresses to calculate the rock mass quality with the equation:
![]()
RQD is the Rock Quality Designation by Deere, Jn is the joint set number, Jr is the joint roughness number, Ja is the joint alteration number, Jw is the joint water reduction factor, and SRF is the stress reduction factor. These parameters are typically obtained from a project site investigation to determine the rock mass quality. The five ‘equivalent material’ case specific Q parameters, intact rock properties, and joint set spacings are presented in Table 1. A Q value of 1.1 – 1.2, or ‘poor rock’, equates to GSI 40.
Rock strength parameters
Rock strength parameters were calculated with the Hoek-Brown strength criterion, except those for Case 3, which were calculated according to the "damage initiation and spalling limit" approach developed by Diederichs. The rock mass deformation modulus was calculated using the Hoek- Diederichs equation. Joint set spacing was calculated using the Priest and Hudson methodology, which correlates RQD and joint frequency. Joint strength and stiffness were quantified using the Barton and Bandis slip criterion, and the approaches by Barton and Kulhawy, respectively.
Tunnel and rock support design
Two excavation methodologies, a 10m diameter TBM tunnel and a 10m span drill and blast arch tunnel, were used to determine the impact of each rock mass case behavior on the tunnel and rock support design. In the circular tunnel, rock support was installed behind the cutterhead, at 4m from the face, while in the arch tunnel, assumed 4m long drill and blast rounds permitted support to be installed on average 2m from the face. Good quality blasting was assumed for the arch tunnel analyses. Rock mass models are shown in Figures 1 and 2.
In accordance with the poor rock mass quality and an Excavation Support Ratio of 1 for "major road and railway tunnels", permanent rock support consists of 3m long bolts spaced 1.7m in plane, with 90mm of fibre-reinforced shotcrete (Figure 3) (Barton and Grimstad, 1994).
In the numerical models, the 19mm diameter tieback bolts had a 0.1MN tensile strength, and a 100 per cent grouted bond length with bond strength of 50MN/m. The shotcrete layer was modelled as an elastic liner in order to calculate overstress, with a compressive strength of 40 MPa, and a tensile strength of 6 MPa to account for the steel fibers.
Unsupported model results
Case 1: Squeezing
Squeezing is a ductile failure mechanism which occurs in high in-situ stress environments in weak rocks. On excavation, shear zones develop around the tunnel. Squeezing is exacerbated when clay minerals are present.
The influence of the excavation methodology on a squeezing rock mass is clearly demonstrated in the contrasting circular and arch tunnel results (Figure 4). While both tunnels experience extreme squeezing (Hoek and Marinos, 2000), in the circular tunnel squeezing is restricted by the influence of the surrounding rock mass, resulting in some 8 per cent strain. In contrast, the arch tunnel excavation shape permits greater strain to occur, on average 15 per cent, in the crown and sidewalls.
For each tunnel, displacement is on the left, and element yield is on the right. Material that has deformed greater than 0.25 – 0.3m has been assumed to have fallen out or removed, and is shown in white. M = deformation magnifier.
Case 2: Stratified structure
Failure in shallow bedded and jointed sedimentary rock tunnels occur when the bedding plane weight is greater than the strength along the bedding or joint planes, causing fall-out.
In both tunnels, thick bedding planes fail until approximately 3m above the tunnel crown, where thinner beds are encountered. Additionally, failure along a non-persistent joint located in the left tunnel wall allows sliding rock deformation into the tunnels. The tunnels’ close proximity to surface does not permit the in-situ stress to become a failure instigator. While the same amount of failure occurs in both tunnels, the arch tunnel excavation shape provides greater structural stability than the circular excavation, as the arch tunnel undermines fewer bedding planes above springline. Also, in the TBM excavated tunnel, the greater time-lag between the excavation and rock support installation allows for a greater amount of rock fallout to occur due to time, TBM vibration, etc.
Case 3: Slabbing / spalling
Slabbing or spalling is a hard rock brittle failure mechanism that can occur in deep tunnels.
Tension cracks form where the induced stress concentrations surrounding an excavation are greater than the intact rock strength (Diederichs, 2007). In both tunnels, induced stress concentrations in the crown and invert cause rock mass tensile and joint failure. Stress relaxation occurs along the sidewalls, creating wedges. However, the induced stress results are more pronounced in the arch tunnel, due to its shape. It is obvious that a circular tunnel is best able to mitigate the effects of high in-situ stress.
Case 4: Metamorphic structure
In foliated metamorphic rocks under high stress, the cleavage planes provide preferred failure paths. The major principle stress orientations and the in-situ stress anisotropy significantly dictate the deformation extent. In both tunnels, the perpendicular orientation of 1 to the inclined cleavage plane causes approximately 0.15m of inclined shear displacement. Neither the circular nor arch tunnel shapes mitigate the extent of structural failure.
Case 5: Raveling
Raveling occurs in a completely disintegrated rock mass with a small block size and nearly zero cohesion (Marinos, 2012). The ravelling extent is influenced by the joint frictional strength and the presence of water.
In the circular tunnel, deformation in the crown and sidewalls propagates upward several tunnel diameters. Deformation is steered left due to the interaction between the joint network orientations and the in-situ stress. In comparison, displacement appears restricted in the unsupported arch tunnel as the deformation in the crown and right sidewall do not connect and propagate.
Supported model results
As shown in Figures 5-8, standardized rock support is inadequate for the majority of cases. Overall, the majority of the rock bolts reached the maximum axial load and the shotcrete liner is inadequate for the squeezing, metamorphic structure and raveling rock mass behavior cases. Both tunnels in the squeezing rock mass are unable to withstand the rock mass failure mechanism. About 33 per cent of the bolts fail in the circular tunnel, and nearly all the bolts fail in the arch. The liner capacity is exceeded in both.
In the bedded sedimentary the support is adequate in both the excavations. However, the arch tunnel shape is more structurally stable as rock support, scaling or both is required over a greater circumference in the circular than in the arch tunnel.
In the slabbing/spalling circular tunnel excavation while nearly all the bolts fail along the joint planes, the compressive strength of the liner is maximized and is able to sustain the high in-situ stresses. In the arch tunnel, high stress concentration corners cause liner failure, and sidewall wedges cause large liner bending moments.
In the foliated metamorphic rock mass, as the rock mass and rock support failed similarly in both tunnels, the critical design item is not the excavation shape, but to design appropriate rock support for the rock mass behavior.
In raveling rock masses, support should be installed as soon as possible to mitigate rock deformation. While the unsupported circular tunnel experienced a greater amount of deformation, the circular liner is more effective at restraining the rock mass than the arch tunnel, due to its shape.
Conclusions
Developing a tunnel and rock support design based on the results from a standard rock mass classification system and intact rock properties alone is limited in scope. It neglects to consider the failure mechanism, the rock mass – rock support interaction, and generates behavioral uncertainty. The five ‘equivalent material,’ behaviorally different models demonstrate that the recommended support for a poor rock tunnel proves inadequate once the rock yielding behavior, in-situ stress, rock mass structure and the groundwater pressure are incorporated in the rock behavior. As these factors control the failure initiation location, magnitude and propagation direction, they should be a key component in determining tunnel and support design.
This type of analysis, while not able to capture all the variations in the ground conditions, is useful in determining the expected ground behavior. However, there are a few issues which require industry discussion. With regards to tunnelling contracts, one issue to consider is which party should be responsible for carrying out this type of analysis. Typically this would depend on the type of project delivery method, and how ground risk has been allocated. On a design-bid-build project this type of analysis may prove difficult as typically the selection of excavation means and methods is done by the contractor. However, if the results of this type of analysis are included in a GBR, it may lead to decreased bid prices as the rock mass behavioral uncertainty is reduced, and less claims due to unforeseen ground conditions during construction. On a design-build project, typically the contractor carries a greater portion of the ground risk. Should the contractor perform this analysis, the knowledge gained may aid in the selection of excavation means and methods to reduce the failure mode severity, and the project risk. For both methods, while the owner may face increased costs during the design stage with this type of analysis, the cost savings during construction outweigh this initial increased cost. If rock mass failure occurs during tunnel excavation, both the owner and the contractor are better prepared from a contract and construction perspective, mitigating or lessening disputes and delays, and aids in determining cause of failure. As expected ground conditions are one of the most important aspects of a project, the rock mass failure mechanism should be incorporated into GBRs in describing the expected ground behavior.