
Austria’s US$77.3M Achrain Tunnel is the heart of the new route for the L200 motorway, which runs from the future Dornbirn North roundabout into the Bregenzer Forest and provides a direct connection to the A14 Rheintal motorway (figure 1).
The Achrain Tunnel has a total length of 3,340m, including a 35m long open cut approach section in the east, and a 75m long one in the west. It consists of a 120m – 190m2 cross sectional area three-lane main tunnel with a 5.2% gradient and an escape tunnel running parallel to it with a length of 3,165m. In order to define the geological conditions along the alignment, the emergency escape tunnel for the road tunnel was bored in 2000 and 2001 as a pilot tunnel using a 3.9m diameter TBM.
As well as the main tunnel, along with niches and crossovers, the construction lot also includes east and west service centres, the removal of earth deposit to an approx. 1.8km long area above ground and the partial reconstruction of the existing pilot tunnel.
The Joint Venture Achrain Tunnel, consisting of Beton- und Monierbau, Alpine-Mayreder, and Jäger Bau, was awarded the contract on 3rd June 2004 and construction began officially on the tunnel soonafter on 22nd June 2004.
Excavation was carried out by either drill and blast, or roadheader, where suitable for the ground conditions, using NATM followed with a fast ring closure. Lining comprised lattice girders every 1.7m on average, with a 150 – 250mm primary lining of sprayed shotcrete according to ground conditions, and a 300 – 400mm cast in place concrete lining. Rockbolts were applied, again, according to the local geology.
Tunnel construction technique
Excavation was predominantly carried out in the “Weissachschichten”, a succession of variegated marls containing layers of sandstone. Those sediments belonging to the Lower Freshwater Molasse were largely marl interspersed with sandstone layers of various thicknesses.
As a result of the high content of active clay minerals and the inherent swelling potential in the marls in the Weissachschichten, the construction of the pilot tunnel had been rather problematic, from a tunnelling point of view.
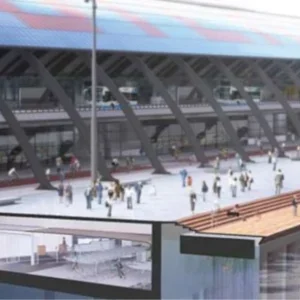
With this in mind, for the main road tunnel the designer included a deep invert arch in ground highly susceptible to swelling. A shallow invert arch was used in areas, where fewer swell-able clay minerals were present (figure 2 and 3).
By using the appropriate reinforcement in the invert, the swelling pressure can increase to as much as 600kN/m² without jeopardizing the stability of the tunnel.
In the case of the shallow invert arch, the excavation cross-section amounted to 125m2, and 150m2 for the deep invert arch; the parking bay niche had already reached an impressive 190m2.
Furthermore, the time schedule and distance criteria for tunnelling specified by the designer had to be strictly observed. In the case of the deep invert arch, the maximum distance between the top-heading face and the bench face was 150m, and from the bench face to the invert a further 20m.
In addition, the shotcrete invert arch had to be applied two months after the crown excavation, and the reinforced cast concrete invert arch a further two months later. The entire inner lining had to be built two months later again.
Longitudinal breaks in construction were not allowed in the benches or in the shotcrete invert arch. Also, the reinforced invert arch also had to be constructed in one process, i.e. without a longitudinal joint.
Estimations on the construction timescale were researched thoroughly to ensure maximum cost efficiency during tunnelling. The simultaneous completion of the tunnel inner lining had to be coordinated with the progress of the tunnel drive and defined timescale.
Optimizing progress called for concreting in weekly shifts with one team concreting a 12m long invert arch, or arch block alternately every second day. This method of construction with consistently equal working cycles quickly proved efficient. There was enough time for necessary preparation and reworking, which also proved to be advantageous in maintaining quality.
The tunnel bridge
The simultaneous construction of the inner lining without halting the excavation progress called for the continuous work on the invert to be bridged on a large scale. To achieve this, a 52m long motorised steel bridge was brought in, which was available in time for the start of tunnelling. With both ramps the bridge had a total length of 89m and with all additional equipment weighed approximately 300 tons (figure 4).
The tunnel bridge served, as mentioned, to bridge the invert workspace over a length of 45m (including ramps) and to allow for vehicles to drive over it with a total weight of a maximum 70 tons, with only one vehicle allowed on the bridge at any one time.
The basic construction of the bridge was a solid steel structure consisting of two bridge sections and two ramps, which were hinged together. Both edges of the access ramps were equipped with slat-like wedges. As well as both bridge sections, there was a separate walkway on the right-hand side, which was accessible via stairs.
The bridge was operated using two electrically driven 11kW motors, with steer-able heavy-duty wheel axels built into both ends. The front part of the bridge stood on the muck deposit, which was suitably compacted. The rear section of the bridge stood on the already concreted invert with a transverse gradient of ± 2.7% to the middle of the tunnel.
It took approximately 10 minutes for it to travel a 12m section.
To enable construction vehicles to drive over the bridge, as well as during concreting and bulkhead forming, the wheeled undercarriage was raised and the support cylinders took the load.Supporting legs were therefore available left and right, next to the axles. The supporting leg bracing was performed by supporting discs, with the support discs in the earth deposit area having a diameter of 1150mm for extra load spread, while all others had a diameter of 800mm.
The middle of the bridge was hinged and supported by 2 hydraulic props, which extend telescopically to deal with the two different invert cross-sections – deep invert and shallow. The middle prop was oscillatory and was only stabilised by retaining cables, which sagged freely, when driving up the bridge.
The space in front of the middle prop (approximately 22m) was used to prepare for concreting, i.e. in this area the banked up, temporary road surface was removed by excavator and wheel loader
In the space behind the middle prop there were two work bays, each 12m long, one of which was a concreting bay, separated by a transportable steel bulkhead formwork, and the other was the reinforcement bay.
The access ramps were designed with the wedges on the bridge so that the maximum ramp gradient does not exceed 13%. The front ramp could be raised using two hydraulic cylinders to a height of maximum 2m. The rear ramp was raised on hydraulically actuated supporting wheels.
Under the rear bridge section, the concreting device was conveyed up and down by a chain hoist. Solid U-rails were also welded onto the outside of the bridge, allowing the base frame of the concreting device to travel by trolley. One third of the base frame could be walked on in order to be able to reach the control panel and connect/disconnect the equipment on the longitu-dinal feed. The concreting device consisted of three conveyor belts GB 500 including;
• one feeder belt, this could be fed via the concrete mixer
• one transfer belt, reversible
• one distribution belt, reversible
This permitted the placing of concrete as required in the entire area.
The vibration opening, with an additional operations platform, was attached to the base frame of the bridge by two tension rods. The vibrating beam and operations platform was equipped with a carriage on the side and ran on the longitudinal beams. These longitudinal beams, in the shape of solid profiles to which the side shoulder formworks were mounted, were hinged to the bulkhead formwork and formed a unit.
Following the invert arch, the mass concrete was then poured and compaction was carried out by six immersed vibrators.
Both beam trolleys travelled on the same beams as the base frame of the concreting device for transportation of bulkhead formwork. For both cross-section profiles, two different bulkhead formworks were required.
1) Bulkhead formwork for the “shallow invert”: A one-piece formwork, with attachment points above left and right for both vibrator panel carriage beams. Two lifting jacks were fixed to the formwork underneath for height adjustment.
2) Invert formwork for the “deep invert“: A two-piece formwork; both halves were connected by three spiggots.
The distance of deep invert arch came to exactly 1,537m from a total of 3,235m of mined tunnel, almost half the length.
The tunnel was broken through in March 2007 and the inner lining was completed in September 2007 – about 6 months later. The eastern open-cut and the attached service building had also been concreted by the end of 2007.
Since April 2007, the pilot tunnel, so far used for ventilation, was completely renovated and converted into the future escape tunnel. Work to fully fit-out the tunnel began in February 2008. After the completion of the fit-out, the tunnel was officially opened for traffic on 29th January 2009 with an opening ceremony.
Summary
Observing a construction schedule, which had already been drawn up at the estimation stage, and carrying out sound preparation lead to a linear construction site largely characterised by the lean allocation and eco-nominal use of resources. Despite the simultaneous excavation work and construction of inner lining, only 50 men were employed in the tunnel.
This parallel operation was only made possible by the bridge that was constructed so that it could be used as formwork and equipment bearer and as a concrete dis-distribution beam at the same time.
Construction conditions were, of course, also appropriate and the inner lining could be constructed without obstruction from ventilation ducts, as the pilot tunnel was used for ventilation.
Last but not least, the constructive interaction between clients, designer, site supervision and Joint Venture produced the successful conclusion to construction that had been hoped for. T&T
Figure 1 – Project site map Above top: Fig 2 – Typical cross-section
for the shallow Invert
Above bottom: Fig 3 – Typical cross-section
for the deep Invert
Fig 2 and Fig 3 Pic 1 Pic 2 Pic 3